
Brand new to the forum and I have a tech question about Marker 12.0 Piston binding. I would like to adjust them larger to fit my larger boots. I always do this with my kids boots but I could not see how to do this on these Markers. Does anyone know how?
Thanks,
Jim :)
Marker 12.0 Piston adjustment
Login
hey, thanks.
yeah, could not be easier. it seems like a great system, hope it holds up.
i just hope someone else will find this info helpful.
To Create or Answer a Topic
Started by Diamondcutter in Ski Hardware 10-Dec-2006 - 11 Replies
Diamondcutter posted Dec-2006
Midfielder
reply to 'Marker 12.0 Piston adjustment' posted Dec-2006
Large phillips screw at back/base of heelpiece - screw in screw out. They have a pretty good range. Beyond a certain point you would have to remount the bindings. They have a notched rod that connects toe and heel and fits together in pretty fine gradations to set for boot sole length. There' a window on one side of the toe with a little gauge mark to indicate proper binding flex. A bit tricky to mount - ski shops screw them up sometimes. Great binding though.
Pavelski
reply to 'Marker 12.0 Piston adjustment' posted Dec-2006
The above reply is correct, however you MUST consider the rear tension pressure level when you do the first "adjustment". This rear pressure is what pushes the boot heel forward and down!
It is critical to your safety!
Typically you have a mark, a "acceptable zone" or a screw head that must align with housing to indicate "correct" rear pressure!
On this model I am not sure what indicator you have!
Please check out for your safety!
It is critical to your safety!
Typically you have a mark, a "acceptable zone" or a screw head that must align with housing to indicate "correct" rear pressure!
On this model I am not sure what indicator you have!
Please check out for your safety!
Roxford
reply to 'Marker 12.0 Piston adjustment' posted Nov-2009
I know this is an old thread, but I felt obligated to respond. Hopefully this will be helpful to someone else. And I apologize for the ranting nature of the post, but it's good therapy...
I went to a ski swap and bought a (brand new) pair of last year's K2 Apache Outlaws w/ the Marker 12.0 M.O.D. binding on the M1 "plate" mounting system with the piston option.
I spent 2 days scouring the internet for info on how to adjust the sole size of these bindings with little success. Though the common answer was "take them to a shop...", there were a few posts about how these bindings are sooo easy to adjust and provided some basic instructions, but nothing with pics or what I would consider complete instructions.
I'm a fairly handy fellow and have mounted my own bindings in the past, so I decided to give the adjustments a shot myself. However, after 30 minutes of trying, I'll be damned if I could figure out how to adjust the toe portion of these bindings. The rear binding adjusted like any other binding I've owned, and I could see that the toe should adjust, but it would not budge. I understood the concept of how the plate system works (remove the plate from the ski to adjust both front and rear binding position), but I could not get the bindings and plate off the rails.
So, I broke down and took the ski to the shop to be adjusted. Unfortunately not only did this shop NOT know what they were doing, they tried to cover-up for their lack of knowledge/skills/qualifications by attempting to BS me... <-- nothing pisses me off more than this.
Here's how it went down; The shop calls and says the skis are ready, so I go to pick them up. The guys at the shop tell me "they had a heck of a time with these bindings and that they had to call K2 for info on how to ajdust them, but they weren't much help..." (red flag!). So, then they tell me "these are demo bindings..." (wrong), "these can't be adjusted..." (wrong), "we even tapped on the binding with a rubber mallet to see if we could get them to move" (nooo!). "So what we did was, we moved the rear binding back as far as it would go and we got that boot to fit for you!"(super.) "what's that? no, no... the center of the boot does not need to be over the center of the ski... in fact, these skis are designed to have the boot rear of center..." (WRONG!!)
Needless to say, I was not satisfied with any of these answers. While doing my reseach, I found there was a recall on the demo version of the Marker 12.0 binding (http://www.recall-warnings.com/outdoor-recreation-and-sports/skiing-snowboarding/07-554/), but this was not the binding on my ski (even though the binding in the picture on the recall website looks just like my bindings, only red.) After reading the recall notice and talking with K2, I'm convinced my bindings are not demos. I spent 5-10 minutes on the phone with the K2 tech and finally there was a break-thru... there is a screw that needs to be removed along with unlocking the plate to get the plate off the ski...
OK, time for the whole reason behind this post... but first, here is my obligatory safety statement... use the following info at your own risk. I am not a ski technician and have no formal training in setting up ski bindings. If you are at all uncertain about what you're doing, take the skis to a professional.
However, if you're confident in your abilities to learn and understand complex systems, read on. Hell, it couldn't be any worse than what I went thru today with the ski shop.
The following applies to the 2007/2008 K2 Apache Outlaws with Marker 12.0 M.O.D. on the M1 "plate mount" system WITH the piston vibe-damping option (you know who you are).

To adjust the sole size of this binding, perform the following;
1- Place ski on flat surface (carpeted floor works good) - Optionally, secure the ski brake in the up position with a large rubberband, etc. or temporarily remove the ski brake (single screw)
2- Locate and remove the "M1 Piston Contol" sticker in front of the toe portion of the binding.
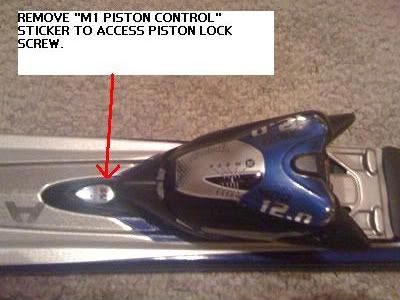
3- Under this sticker is a philips head screw. Remove it.

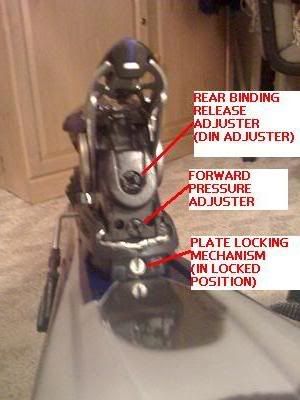
4- At the rear of the binding, locate the binding plate locking mechanism (could be a philips, could be a slotted screw). On these skis, it's a small "silver" colored screw closest to the ski itself. Look carefully at the unlocking mechananism. You shoulnot have to turn the mechanism very far.
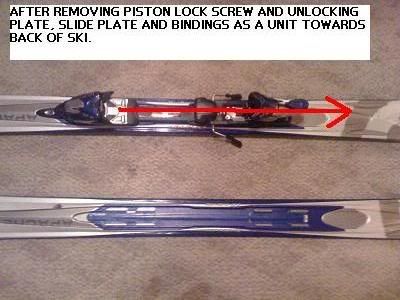
5- Once the locking mechanism has been unlocked, and the piston lock screw removed, slide the entire plate system and bindings (as one unit) towards the back of the ski. The back will slide completely off the rail, the front will go back a ways then it can be lifted off the ski rails.
6- After the plate and binding have been removed from the ski, turn the unit over.

7- The piston mechanism should now come apart from the binding plate. Thoroughly examine it to understand how it works.
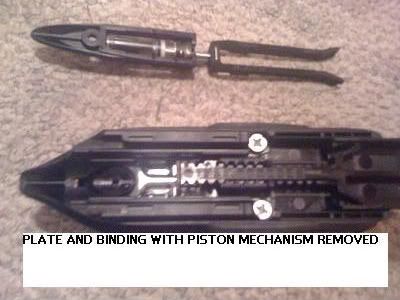
8- Directly underneath the toe portion of the binding (on the bottom of the plate) you should notice some numbers associated with an adjusting mechanism.
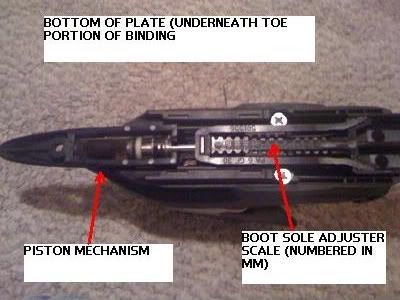
9- Identify your boot size and adjust the plate accordingly. My boot is a size 326, so I set the plate at 325. Fine adjustments are made with the forward pressure adjuster on the back of the binding.
10- Once you have the plate set correctly, reinstall the piston mechanism (only fits one way!) to the plate.
11- Reinstall the binding as you removed it. NOTE: Be sure you start the toe portion of the binding first, then follow with the rest of the plate/binding. Don't over think this, it's not rocket science.
12- Once you have the binding back on the rails, put the piston lock screw back in the binding and replace the sticker (and hope it sticks). Don't forget to lock the plate!
13- Adjust the forward pressure appropriately (the screw should be flush with the binding housing when the boot is in the binding, in the "down and locked" position. NOTE! Do NOT adjust the forward pressure setting with the boot in the down and locked position. This should be a "check, eject boot, adjust, re-insert boot, check... eject boot, adjust, re-insert boot... ckeck, eject boot, adjust, re-insert boot, check..." scenario. you getthe idea.
14- Finally, set the DIN per your height, weight and ability. I'm 6', 240 and consider myself an advanced/expert skiier. The shop set the DIN settings for me at 8, front and back. I'll give this a try, but can see increasing these setting after the initial trip out.
These instructions apply to new equipment and specifically the equipment mentioned above. They do not take into account any worn parts on the bindings or boots. Worn parts can cause dangerous situations, and this is where the shop comes in. Any good ski shop will have the proper equipment to test the binding for proper torque settings, etc. I do not have this equipment. However, since my skis had already been to the "shop", inspected and tested, I'm not too worried about that aspect of these particular bindings. If you are buying used equipment, it's always a good idea to have the shop check them for proper function.
I sincerely hope people find this information useful. I am not trying to put anyone out of work here, I just dont like that K2/Marker does not post these instructions. I get the liability aspect, but feel that a simple disclaimer could address that. If I have mistated anything here, please feel to comment.
Thanks,
Ren-skis
I went to a ski swap and bought a (brand new) pair of last year's K2 Apache Outlaws w/ the Marker 12.0 M.O.D. binding on the M1 "plate" mounting system with the piston option.
I spent 2 days scouring the internet for info on how to adjust the sole size of these bindings with little success. Though the common answer was "take them to a shop...", there were a few posts about how these bindings are sooo easy to adjust and provided some basic instructions, but nothing with pics or what I would consider complete instructions.
I'm a fairly handy fellow and have mounted my own bindings in the past, so I decided to give the adjustments a shot myself. However, after 30 minutes of trying, I'll be damned if I could figure out how to adjust the toe portion of these bindings. The rear binding adjusted like any other binding I've owned, and I could see that the toe should adjust, but it would not budge. I understood the concept of how the plate system works (remove the plate from the ski to adjust both front and rear binding position), but I could not get the bindings and plate off the rails.
So, I broke down and took the ski to the shop to be adjusted. Unfortunately not only did this shop NOT know what they were doing, they tried to cover-up for their lack of knowledge/skills/qualifications by attempting to BS me... <-- nothing pisses me off more than this.
Here's how it went down; The shop calls and says the skis are ready, so I go to pick them up. The guys at the shop tell me "they had a heck of a time with these bindings and that they had to call K2 for info on how to ajdust them, but they weren't much help..." (red flag!). So, then they tell me "these are demo bindings..." (wrong), "these can't be adjusted..." (wrong), "we even tapped on the binding with a rubber mallet to see if we could get them to move" (nooo!). "So what we did was, we moved the rear binding back as far as it would go and we got that boot to fit for you!"(super.) "what's that? no, no... the center of the boot does not need to be over the center of the ski... in fact, these skis are designed to have the boot rear of center..." (WRONG!!)
Needless to say, I was not satisfied with any of these answers. While doing my reseach, I found there was a recall on the demo version of the Marker 12.0 binding (http://www.recall-warnings.com/outdoor-recreation-and-sports/skiing-snowboarding/07-554/), but this was not the binding on my ski (even though the binding in the picture on the recall website looks just like my bindings, only red.) After reading the recall notice and talking with K2, I'm convinced my bindings are not demos. I spent 5-10 minutes on the phone with the K2 tech and finally there was a break-thru... there is a screw that needs to be removed along with unlocking the plate to get the plate off the ski...
OK, time for the whole reason behind this post... but first, here is my obligatory safety statement... use the following info at your own risk. I am not a ski technician and have no formal training in setting up ski bindings. If you are at all uncertain about what you're doing, take the skis to a professional.
However, if you're confident in your abilities to learn and understand complex systems, read on. Hell, it couldn't be any worse than what I went thru today with the ski shop.
The following applies to the 2007/2008 K2 Apache Outlaws with Marker 12.0 M.O.D. on the M1 "plate mount" system WITH the piston vibe-damping option (you know who you are).
To adjust the sole size of this binding, perform the following;
1- Place ski on flat surface (carpeted floor works good) - Optionally, secure the ski brake in the up position with a large rubberband, etc. or temporarily remove the ski brake (single screw)
2- Locate and remove the "M1 Piston Contol" sticker in front of the toe portion of the binding.
3- Under this sticker is a philips head screw. Remove it.
4- At the rear of the binding, locate the binding plate locking mechanism (could be a philips, could be a slotted screw). On these skis, it's a small "silver" colored screw closest to the ski itself. Look carefully at the unlocking mechananism. You shoulnot have to turn the mechanism very far.
5- Once the locking mechanism has been unlocked, and the piston lock screw removed, slide the entire plate system and bindings (as one unit) towards the back of the ski. The back will slide completely off the rail, the front will go back a ways then it can be lifted off the ski rails.
6- After the plate and binding have been removed from the ski, turn the unit over.
7- The piston mechanism should now come apart from the binding plate. Thoroughly examine it to understand how it works.
8- Directly underneath the toe portion of the binding (on the bottom of the plate) you should notice some numbers associated with an adjusting mechanism.
9- Identify your boot size and adjust the plate accordingly. My boot is a size 326, so I set the plate at 325. Fine adjustments are made with the forward pressure adjuster on the back of the binding.
10- Once you have the plate set correctly, reinstall the piston mechanism (only fits one way!) to the plate.
11- Reinstall the binding as you removed it. NOTE: Be sure you start the toe portion of the binding first, then follow with the rest of the plate/binding. Don't over think this, it's not rocket science.
12- Once you have the binding back on the rails, put the piston lock screw back in the binding and replace the sticker (and hope it sticks). Don't forget to lock the plate!
13- Adjust the forward pressure appropriately (the screw should be flush with the binding housing when the boot is in the binding, in the "down and locked" position. NOTE! Do NOT adjust the forward pressure setting with the boot in the down and locked position. This should be a "check, eject boot, adjust, re-insert boot, check... eject boot, adjust, re-insert boot... ckeck, eject boot, adjust, re-insert boot, check..." scenario. you getthe idea.
14- Finally, set the DIN per your height, weight and ability. I'm 6', 240 and consider myself an advanced/expert skiier. The shop set the DIN settings for me at 8, front and back. I'll give this a try, but can see increasing these setting after the initial trip out.
These instructions apply to new equipment and specifically the equipment mentioned above. They do not take into account any worn parts on the bindings or boots. Worn parts can cause dangerous situations, and this is where the shop comes in. Any good ski shop will have the proper equipment to test the binding for proper torque settings, etc. I do not have this equipment. However, since my skis had already been to the "shop", inspected and tested, I'm not too worried about that aspect of these particular bindings. If you are buying used equipment, it's always a good idea to have the shop check them for proper function.
I sincerely hope people find this information useful. I am not trying to put anyone out of work here, I just dont like that K2/Marker does not post these instructions. I get the liability aspect, but feel that a simple disclaimer could address that. If I have mistated anything here, please feel to comment.
Thanks,
Ren-skis
Trencher
reply to 'Marker 12.0 Piston adjustment' posted Nov-2009
Pretty simple, once you know where that screw is hidden. Atomic have a really easy to adjust rail system. The Fischer system is almost as easy. Both of these are anchored in the middle of the binding (where you would expect it to be). It could be that K2 were thinking it would be good for the skiers weight to move back, as the ski flexes in a turn. So anchoring the binding on the rail, at the front would achieve that. Great photos and explanation BTW
Trencher
Trencher
because I'm so inclined .....
Edited 2 times. Last update at 19-Nov-2009
Roxford
reply to 'Marker 12.0 Piston adjustment' posted Nov-2009
Great photos and explanation BTW
hey, thanks.
yeah, could not be easier. it seems like a great system, hope it holds up.
i just hope someone else will find this info helpful.
Edited 1 time. Last update at 19-Nov-2009
Merwin
reply to 'Marker 12.0 Piston adjustment' posted Dec-2009
Grateful thanks to "roxford" for writing a great explanation and decyphering the mystery of the Marker 12.0 binding. Like Roxford, I tried to figure out how to adjust the bindings after getting a new pair of boots and was stymied, trying every-which-way to get the bindings off without resorting to excessive force. I was about to give up when I saw this post which revaled the secret of peeling off the sticker.
I wonder how many times you can peel if off before it's useless.
I wonder how many times you can peel if off before it's useless.
Roxford
reply to 'Marker 12.0 Piston adjustment' posted Dec-2009
glad to be helpful.
and just try to find that little tid-bit of info on the web!
once.... maybe. i'm guessing it will be gone by the end of the first day.
and just try to find that little tid-bit of info on the web!
I wonder how many times you can peel if off before it's useless.
once.... maybe. i'm guessing it will be gone by the end of the first day.
Topic last updated on 05-January-2010 at 03:19